After spending time with cloud platforms like Azure, AWS, and DigitalOcean — as well as Type 2 hypervisors (like VirtualBox) — I decided to try something new: a Type 1 hypervisor installed directly on hardware. My choice? The open-source, free, and powerful Proxmox VE (Virtual Environment).
Here’s a step-by-step walkthrough of how I installed and configured Proxmox VE 8.4, along with some beginner-friendly notes for those new to bare-metal setups 💡
🛠️ Step 0 – Check System Requirements
Before diving into installation, make sure your hardware is compatible with Proxmox. You’ll need:
A dedicated server or machine
Virtualization support (VT-x / AMD-V)
At least 4 GB RAM (8 GB or more recommended)
SSD or HDD with enough space
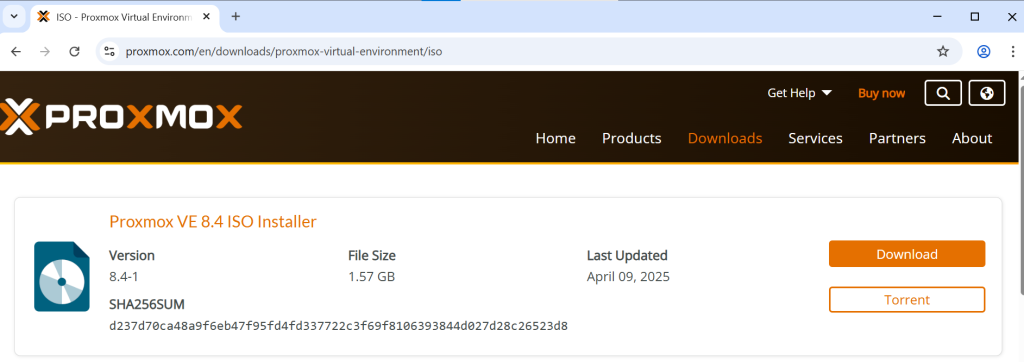
💽 Step 1 – Download the ISO
Go to the official Proxmox VE website and download the latest LTS version of the ISO installer.
🔧 Step 2 – Create a Bootable USB Drive
Use Rufus to create a bootable USB stick. When prompted with the warning ISOHybrid image detected, don’t worry — just click Start ✅
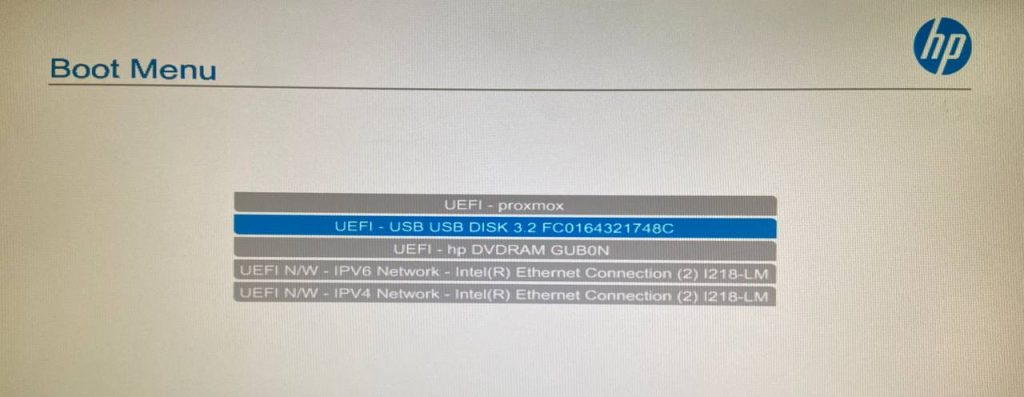
💻 Step 3 – Boot from USB and Start Installation
You’ll need physical access to the server.
Plug in the USB stick
Enter BIOS/UEFI
Change the boot order to boot from USB
Start the Proxmox installer
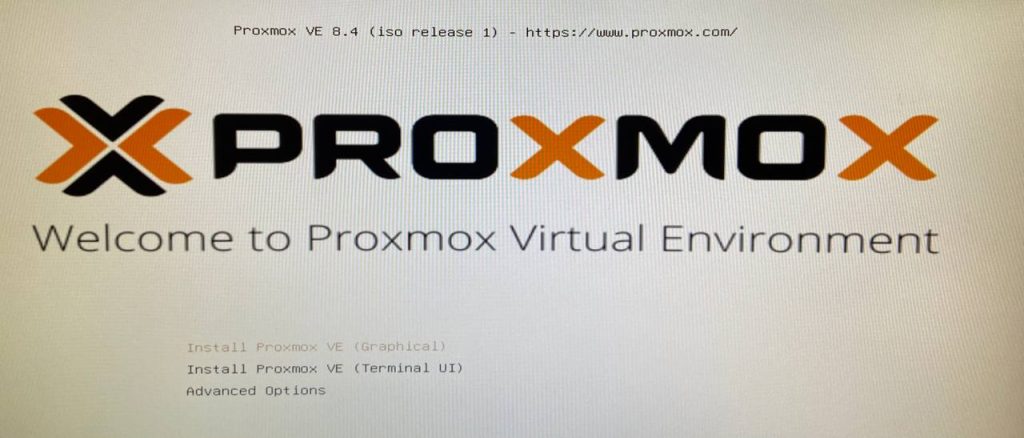
(Installing Proxmox feels similar to installing any OS — because under the hood, Proxmox is Debian Linux 🐧)
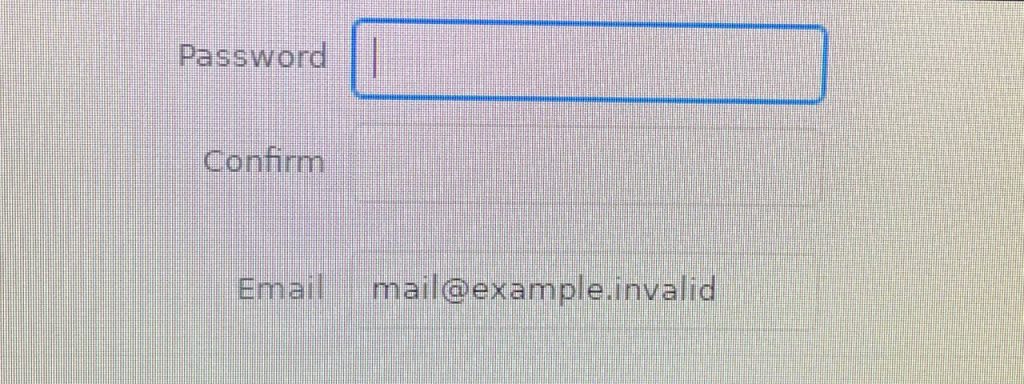
⚙️ Step 4–7 – Installation Configuration
You’ll go through several steps:
Disk selection for the Proxmox installation
Region, timezone, and keyboard layout
Root password
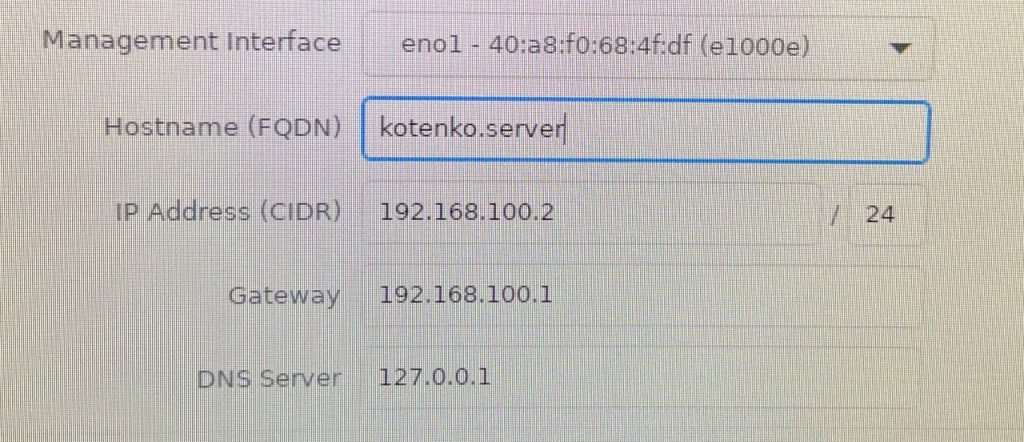
Hostname, IP address, gateway, and DNS settings
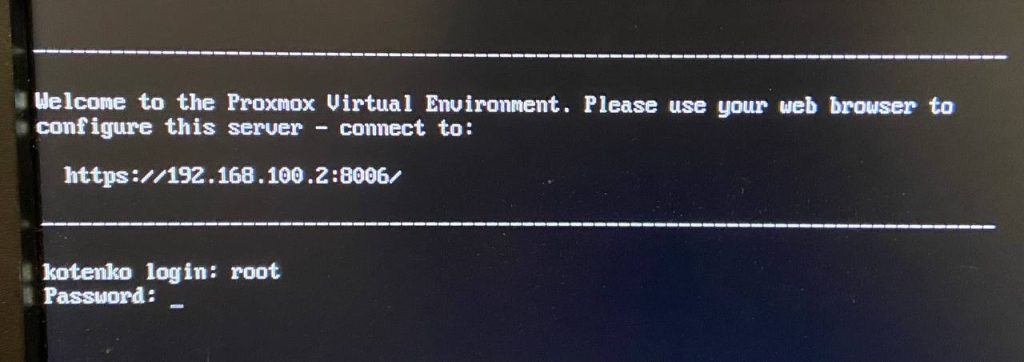
🔐 Step 8 – First Login via Console
Once installed, you’ll see the “Welcome to Proxmox”, use:
Username: root
Password: the one you just set
🔎 At first, I wasn’t sure which user to log in as — in the cloud it’s often admin, but here it’s root. If you see the following screen, you’ve logged in successfully:
🌐 Step 9 – Network Setup for Web Interface Access
To use the GUI, you’ll need a second computer on the same network as your Proxmox server.
🔌 Option: Direct LAN connection
We’ll use a direct Ethernet cable (UTP) connection:
On your PC, assign: 192.168.1.1/24
On the server, assign: 192.168.1.100/24
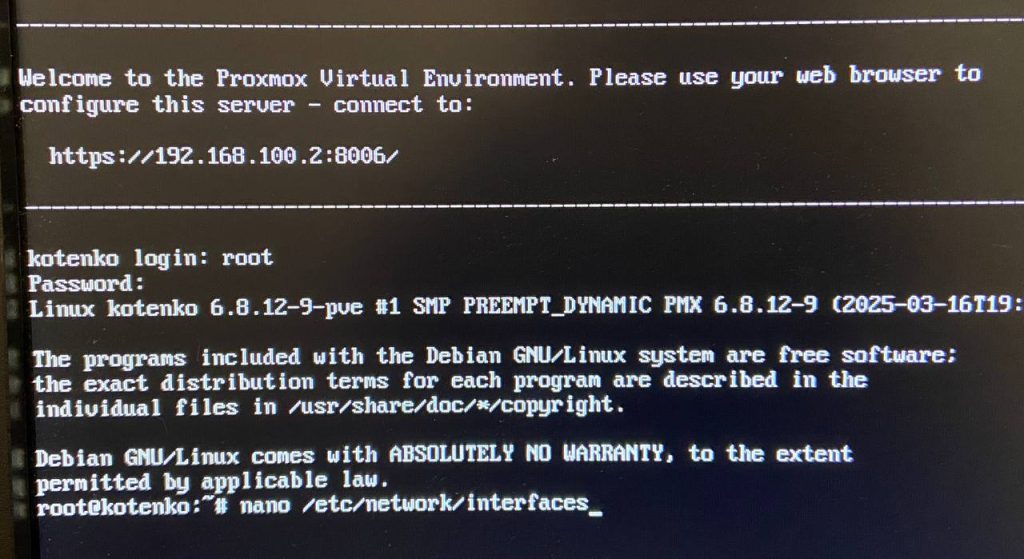
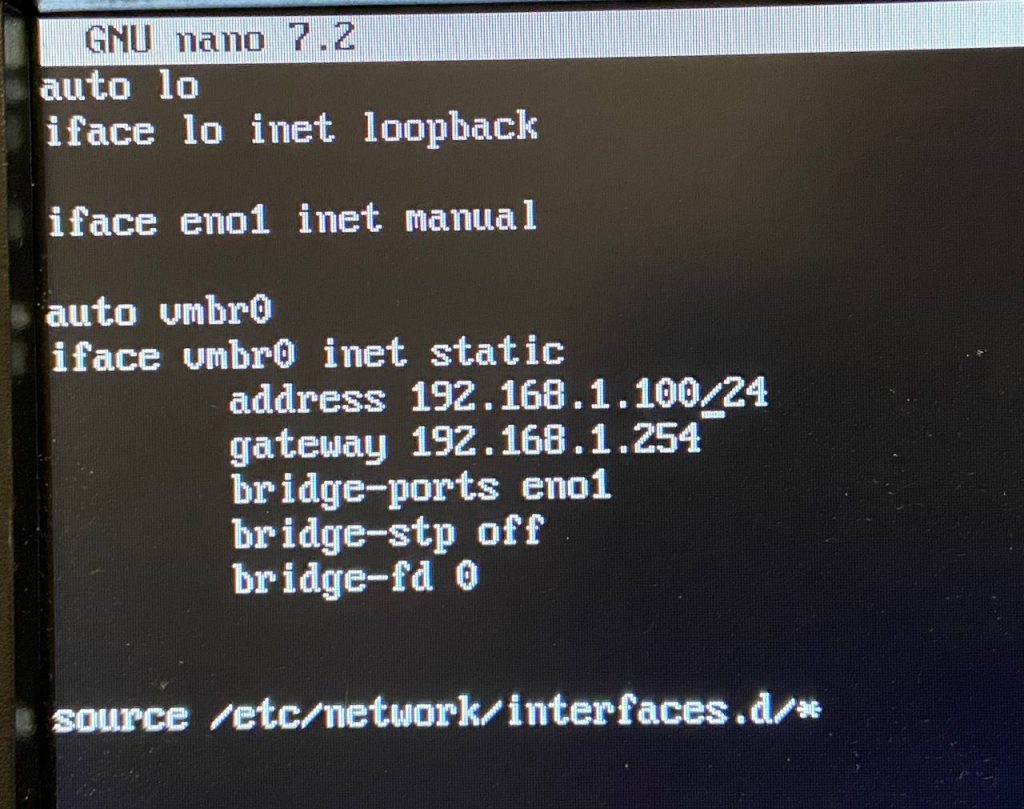
Edit the network configuration file on the server: nano /etc/network/interfaces
📝 Step 10 – Update Network Settings
You’ll likely see 3 interfaces: lo, eno1, and vmbr0.
Update vmbr0 like this: address 192.168.1.100/24 gateway 192.168.1.254 (The gateway is optional for local-only setups).
Save changes with:
Ctrl + O to write
Ctrl + X to exit
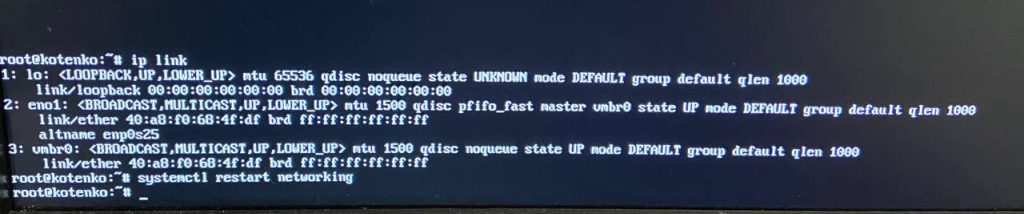
🔄 Step 11 – Restart Network
Apply the changes by restarting networking: systemctl restart networking
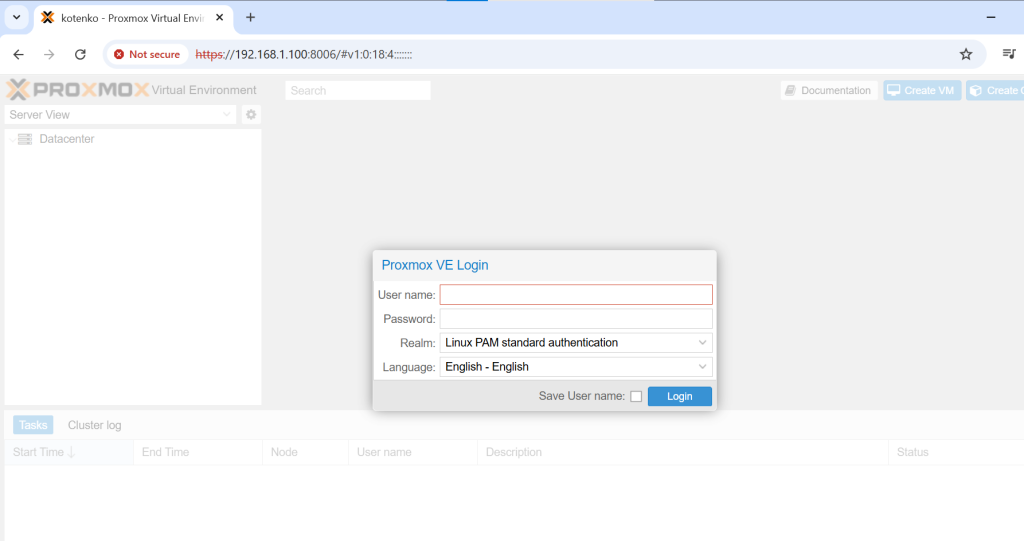
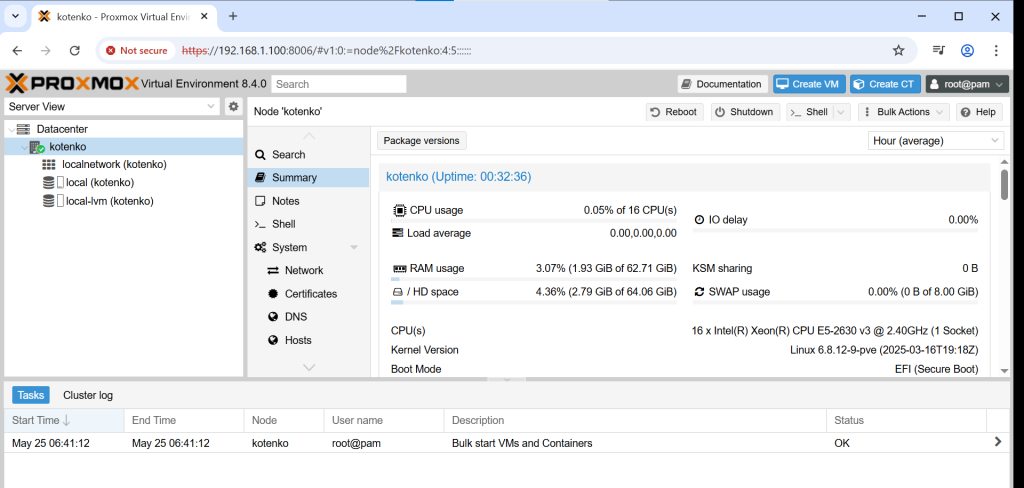
✅ Step 12 – Test and Access the Web UI
From your PC, ping the server: ping 192.168.1.100
If ping works — go to your browser and enter: 192.168.1.100:8006
You’ll see the Proxmox Web UI login screen:
Log in with root and the password you set earlier.
🧠 Final Notes & Tips
Browser warnings: The certificate is self-signed — you can safely proceed
If ping fails: Double-check IPs, cables, and subnet masks
Security tip: Consider setting up a firewall and restricting access to port 8006
Updates: Run apt update && apt full-upgrade regularly to keep the system secure
✨ WARNING: I won’t swear by 100% accuracy – consider it more like my interpretive dance with the topic! ✨ Enjoyed this? Like and share! 🙌
28 thoughts on “How to Install and Set Up Proxmox VE 8.4”
Sprunki Incredibox adds a fresh twist to music-mixing fun with new beats and visuals. It’s a great pick for casual players who love creativity. Check out the Sprunki Phase Game for more innovation!
Texas Hold’em isn’t just about cards-it’s a battle of minds. Much like crafting beats in the Sprunki Christmas Game, success in poker requires timing, creativity, and reading the room. Both demand strategy and flair.
Great read! It’s fascinating how mods like Sprunki Incredibox keep the creative spirit of games alive with fresh twists. Check out more innovations in Adventure Games.
Been playing at acesupercasino for a bit and gotta say, they’ve got a nice selection of games. Payouts are okay too. Check them out yourself: acesupercasino
Interesting read! The convenience of quick registration, like with platforms offering a jilivs app download apk, really elevates the user experience. Seamless access is key for enjoyable gaming! 👍
Slots are so fun, but responsible gaming is key! Seeing platforms like JiliVS focus on quick registration & security (like ID verification) is great. Check out the jilivs apk for a smooth experience – instant deposits sound handy! 😉
Dice games are surprisingly complex when you start thinking about probabilities! Seeing platforms like jilivs legit offer diverse games-slots, live casino-makes understanding those odds even more interesting. Quick registration is a plus too! 🤔
Roulette’s allure is fascinating – the probabilities are clear, yet the thrill remains! Thinking about secure access & legit platforms like sugal777 app casino is key for a good experience. Registration seems straightforward too! 🤔
That article really hit the nail on the head about team synergy! Thinking about consistent wins… reminds me of the potential at sugal777 online casino – consistent play could really add up. Easy access via the app too! Great read overall.
Roulette’s allure is fascinating – that blend of chance & strategy! Seeing platforms like Sugal777 embrace accessibility with options like sugal777 download apk is smart. Secure registration seems key for enjoying the experience, too! 🤔
Interesting read! The focus on localized payment options, like those offered by funbingo ph legit, is key for Philippine players. Accessibility & trust are huge factors in online gaming, and 24/7 support is a big plus! 👍
Interesting points! It’s smart to see platforms like FunBingo PH focusing on localized support & payment options for Filipino players. Considering a try – the funbingo ph app download seems easy enough, and responsible gaming is key! Great article overall.
Dice games are all about understanding odds, right? It’s cool to see platforms like funbingo ph games making it easy for Filipino players to jump in & enjoy various options – plus, responsible gaming is key! 🤔
go88live… sounds interesting. I really value a site that performs well on mobile, and a good community presence. Giving it a shot! Here’s the link: go88live
Interesting analysis! Seeing platforms like jili56 com prioritize speed & easy access is key for mobile gamers. The quick verification sounds great – less friction is always a win! 👍
Yo, what’s up? I stumbled upon 99okclub. Seems alright. Games are pretty standard, but the interface is clean. Might be your thing! Have a look-see: 99okclub
Understanding game odds is key to enjoying any casino experience! It’s great to see platforms like pinoy time gcash game making things accessible with easy GCash integration – convenience and entertainment! Definitely a plus for Filipino players. 👍
Baterybetlogin seems promising! The registration was a breeze and they have a good variety of stuff to bet on. Hope the payouts are quick! Check it out at baterybetlogin.
Alright guys, checked out vuagaazcs and it’s pretty decent. Nothing mind-blowing, but worth a look. I’d say give it a shot and see if it’s your cup of tea. Check it out here: vuagaazcs
MX58casino is pretty cool, I’ve been playing there recently. Lots of different games to choose from, and I had a pretty good experience. Might be worth a look if you’re looking for something new. mx58casino
Alright, so I gave appnovibet a shot, and honestly, it’s pretty decent. The app is smooth, easy to navigate, and they’ve got a solid selection of games. Plus, the odds are competitive. Check it out here! appnovibet


Sprunki Incredibox adds a fresh twist to music-mixing fun with new beats and visuals. It’s a great pick for casual players who love creativity. Check out the Sprunki Phase Game for more innovation!
Texas Hold’em isn’t just about cards-it’s a battle of minds. Much like crafting beats in the Sprunki Christmas Game, success in poker requires timing, creativity, and reading the room. Both demand strategy and flair.
Great read! It’s fascinating how mods like Sprunki Incredibox keep the creative spirit of games alive with fresh twists. Check out more innovations in Adventure Games.
Been playing at acesupercasino for a bit and gotta say, they’ve got a nice selection of games. Payouts are okay too. Check them out yourself: acesupercasino
Interesting read! The convenience of quick registration, like with platforms offering a jilivs app download apk, really elevates the user experience. Seamless access is key for enjoyable gaming! 👍
Slots are so fun, but responsible gaming is key! Seeing platforms like JiliVS focus on quick registration & security (like ID verification) is great. Check out the jilivs apk for a smooth experience – instant deposits sound handy! 😉
Dice games are surprisingly complex when you start thinking about probabilities! Seeing platforms like jilivs legit offer diverse games-slots, live casino-makes understanding those odds even more interesting. Quick registration is a plus too! 🤔
Roulette’s allure is fascinating – the probabilities are clear, yet the thrill remains! Thinking about secure access & legit platforms like sugal777 app casino is key for a good experience. Registration seems straightforward too! 🤔
That article really hit the nail on the head about team synergy! Thinking about consistent wins… reminds me of the potential at sugal777 online casino – consistent play could really add up. Easy access via the app too! Great read overall.
Roulette’s allure is fascinating – that blend of chance & strategy! Seeing platforms like Sugal777 embrace accessibility with options like sugal777 download apk is smart. Secure registration seems key for enjoying the experience, too! 🤔
Interesting read! The focus on localized payment options, like those offered by funbingo ph legit, is key for Philippine players. Accessibility & trust are huge factors in online gaming, and 24/7 support is a big plus! 👍
Interesting points! It’s smart to see platforms like FunBingo PH focusing on localized support & payment options for Filipino players. Considering a try – the funbingo ph app download seems easy enough, and responsible gaming is key! Great article overall.
Dice games are all about understanding odds, right? It’s cool to see platforms like funbingo ph games making it easy for Filipino players to jump in & enjoy various options – plus, responsible gaming is key! 🤔
Checking out c54game8 tonight. Heard they’ve got some new slots that are supposed to be hot. Anyone had any luck there recently?
Simple and short name, 188v… easy to remember! Anyone already messing around on here, are there good games 188v
go88live… sounds interesting. I really value a site that performs well on mobile, and a good community presence. Giving it a shot! Here’s the link: go88live
Bn555game, I’m hoping the games are fun and maybe I’ll win something. Take a look by yourself here: bn555game
For those in the North, minhngocmb looks like a good resource for checking your lottery results. Good luck lads, hope you hit the jackpot!
Interesting analysis! Seeing platforms like jili56 com prioritize speed & easy access is key for mobile gamers. The quick verification sounds great – less friction is always a win! 👍
Yo, what’s up? I stumbled upon 99okclub. Seems alright. Games are pretty standard, but the interface is clean. Might be your thing! Have a look-see: 99okclub
Understanding game odds is key to enjoying any casino experience! It’s great to see platforms like pinoy time gcash game making things accessible with easy GCash integration – convenience and entertainment! Definitely a plus for Filipino players. 👍
Baterybetlogin seems promising! The registration was a breeze and they have a good variety of stuff to bet on. Hope the payouts are quick! Check it out at baterybetlogin.
Alright guys, checked out vuagaazcs and it’s pretty decent. Nothing mind-blowing, but worth a look. I’d say give it a shot and see if it’s your cup of tea. Check it out here: vuagaazcs
Alright, just had a go at j88abcvip. I must say it is more complicated than other website, but not difficult. Check it out: j88abcvip
Betobetcasino is a real deal casino. They got all sorts of games there, just like you were right in Vegas. Totally worth a visit! betobetcasino.
MX58casino is pretty cool, I’ve been playing there recently. Lots of different games to choose from, and I had a pretty good experience. Might be worth a look if you’re looking for something new. mx58casino
Alright, so I gave appnovibet a shot, and honestly, it’s pretty decent. The app is smooth, easy to navigate, and they’ve got a solid selection of games. Plus, the odds are competitive. Check it out here! appnovibet
很难找到, 如此温暖又有信息量的博客。点赞。 蘇丹艾哈邁德區 非常感谢 照片。非常 激励人。